
Submersible cables rarely fail due to electrical faults; rather, they mostly fail due to mechanical issues. Ask any marine engineers about this, and they will testify to the fact. These cables endure the most challenging environments one can imagine. Exposure to constant water currents, changing loads, abrasive seabeds, UV rays, and scorching sunlight are some of the most common factors affecting these cables. Whether the cable powers dredging equipment, offshore pumps, or underwater systems, one thing is certain: poor cable management leads to early failure.
This is exactly where the correct cable float installation becomes very crucial.
Cable floats are often viewed as simple equipment or accessories. However, in real-world applications, they play a crucial role by protecting the submerged cables, maintaining their stability, and keeping them afloat. If installed properly, these floats help maintain the intended depth of the cables, avoid seabed contact and sagging, and move safely with the water current rather than fighting against it.
In this blog, let’s have a close look at how to accomplish cable float installation properly to secure the submersible cables based on real marine and dredging applications.
- What Makes Cable Float Installation So Important?
- What Cable Floats Actually Do
- Common Applications for Cable Floats
- Planning Before Cable Float Installation
- Tools and Materials You’ll Need
- Step-by-Step Cable Float Installation Process
- Common Mistakes to Avoid
- Inspection and Ongoing Maintenance
- Real-World Example: Dredging Operation
- Better Cable Float Installation For Better Performance
What Makes Cable Float Installation So Important?
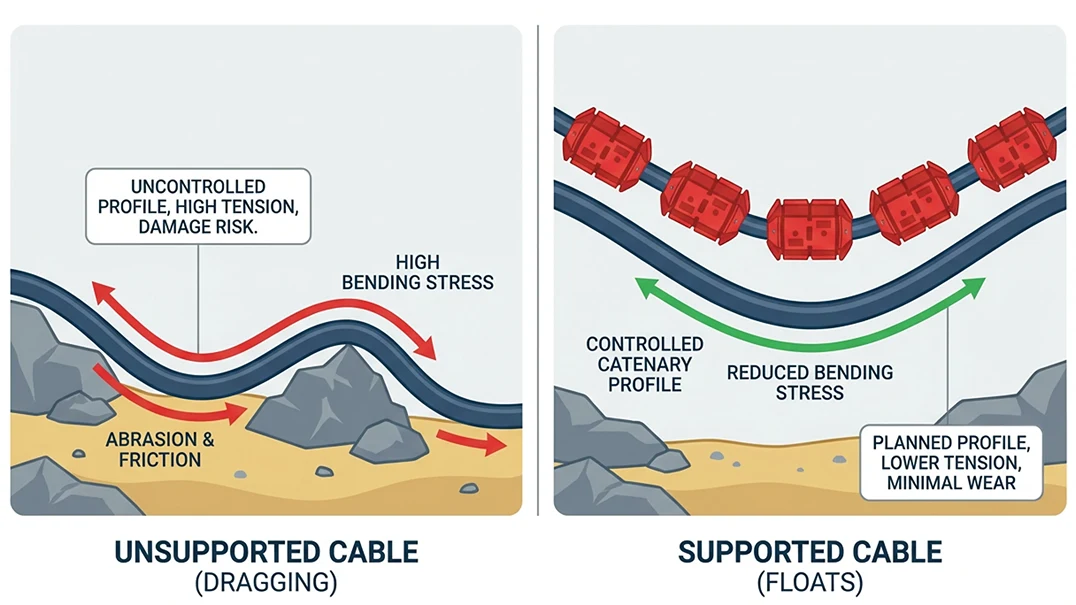
Imagine leaving a submersible cable unsupported in the marine environment. Gravity and water movement will soon start working against it, and over time, this will cause:
- Abrasion from dragging on the seabed
- Excessive bending near terminations
- Stress from currents pulling unevenly along the cable
- Increased risk of snagging on dredging equipment or debris
Cable floats can easily address these problems by distributing the buoyancy force uniformly along the cable length. This shares the load equally on the floats, rather than exposing the cables to carry their own weight underwater. As a result, the overall mechanical stress is reduced, allowing the cables to follow a smoother, more controlled profile.
In dredging operations, cable float installation is not optional. Floating power and control cables are constantly exposed to cutter heads, slurry movement, and shifting sediments. Without floats, cable damage becomes a matter of time, not chance.
What Cable Floats Actually Do
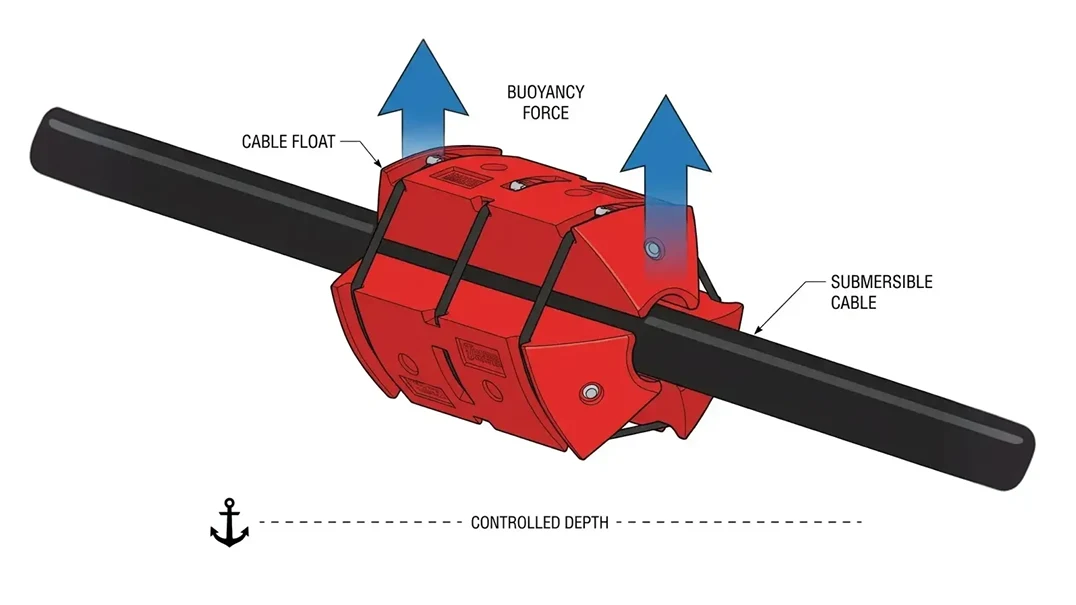
Cable floats are buoyant shells, usually made from marine-grade or high-density polyethylene (HDPE), that clamp around submersible cables. Once installed, they provide an upward force that counteracts the submerged weight of the cable.
Depending on the application, cable floats can be used to:
- Keep cables fully floating on the water surface
- Hold cables at a controlled depth below the surface
- Reduce seabed contact while still allowing some sag
The goal is not always to make the cable “float high,” but rather to control its behavior in water.
Common Applications for Cable Floats
Cable float installation is used across many industries, but the fundamentals remain the same.
-
Dredging Equipment
Dredging equipment operating in marine environments relies heavily on floating power and control cables. These cable keeps moving along with the dredger. Their constant movement makes them prone to burial in sediments along the cutter heads and to constant wear. Cable floats help maintain power and other cables by keeping them afloat and away from these risks.
-
Offshore and Marine Construction
Cables in marine construction are always prone to waves and currents. Submerged cables in such environments require greater stability, which is nearly impossible without an external device. Cable floats come into action in these situations by maintaining consistent routing and reducing cable fatigue.
-
Ports and Harbors
Ports and harbors are high-traffic areas. Submersible cables around ports and harbors are often exposed to moving vessels and boats, resulting in constant wear and tear. Installing cable floats in such environments helps keep cables afloat and visible, preventing damage and accidents.
-
Mining Operations
Submersible cables often get surrounded by thick slurries and other abrasive materials in mining operations. Once these cables sink into the slurry, constant contact with it can gradually damage their outer jackets. Proper installation of cable floats keeps these cables lifted and clear of these abrasive zones.
Planning Before Cable Float Installation
Great installation begins even before the first float is attached to the submersible cables. Here are some of the steps that explain how to plan well before installing the cable floats:
Step 1: Understand the Cable
You need accurate information about the submersible cable:
- Outer diameter
- Weight per meter in air
- Weight per meter when submerged
- Minimum bending radius
Guessing these values can become fatal, as even minor errors can lead to incorrect buoyancy and unstable cable behavior.
Step 2: Decide the Required Buoyancy
None of the operations requires full flotation. Some operations require partial buoyancy or just to keep the submersible cables lifted. Considering these, one needs to ask these questions:
- Should the cable float on the surface or below it?
- How strong are local currents?
- Will the cable move with the equipment or stay mostly fixed?
The answers determine how many floats you need and how far apart they should be placed.
Step 3: Choosing the Right Cable Floats
Before choosing the cable floats, one should check these conditions:
- Are they made from UV-stable, marine-grade material
- Are they rated for the water depth and environment
- Are they designed to clamp securely without damaging the cable
Modular, split-type floats are commonly used because they are easy to install and adjust in the field.
Tools and Materials You’ll Need
Before starting cable float installation, make sure everything is ready:
- Correct number of cable floats
- Fasteners or straps supplied by the manufacturer
- Measuring tape or markers
- Torque tools (if required)
- Standard marine safety gear
Step-by-Step Cable Float Installation Process
Step 1: Set the Cable in Place
- Position the submersible cable along its decided route.
- Try to keep the cable straight and supported so it does not twist or bend while floats are installed.
- Following this, mark float locations clearly based on your spacing plan.
Step 2: Inspect Everything Before Attaching Floats
- Check the cable jacket for cuts or wear
- Clean off mud, grease, or debris
- Inspect floats for cracks or damaged hardware, as installing floats on a damaged cable can cause major issues.
Step 3: Attach the Cable Floats
- Most cable floats come in two halves; place the first half on the ground.
- Position the submersible cable into the groove across the float.
- Place the second half of the float above the first half while keeping the submersible cable positioned in the groove.
- In case more floats are required, place them side by side till the diameter of the cable is covered.
- Slide the nylon strap through the slots in the floats, then tighten it.
- Tighten the strap until the floats sit securely in place, with no movement.
- Lock the stainless-steel ratchet to secure the float assembly.
- Secure any loose ends of the strap with zip ties to prevent it from hanging.
- Repeat the entire process till the floats get secured along the submersible cable.
Step 4: Maintain Required Spacing
- Ensure not keep too much distance between the floats
- Too much space can result in cable sagging and stress.
- Keeping the floats too close can cause unnecessary buoyancy and instability.
- Maintain consistent spacing unless design conditions require tighter placement near bends or terminations.
Step 5: Secure and Double-Check
- Re-check alignment once all the floats are installed.
- Double the fasteners on each float.
- Ensure floats cannot slide along the cable.
Step 6: Lower the Cable into the Water
- Let the cable slowly submerge in water in a controlled manner and watch how the cable behaves.
- The entire assembly should rise smoothly.
- There should not be any sudden lifting or twisting.
- No sections should be dragging on the seabed.
- If the cable does not sit as expected, adjust float spacing before final positioning.
Common Mistakes to Avoid
Here are some mistakes that need to be avoided to maintain consistent performance of the float line:
- Over-buoyancy: cable rides too high and moves excessively
- Under-buoyancy: cable still drags and wears out
- Uneven spacing: creates stress points
- Loose fastening: floats shift over time
Cable float installation works best when buoyancy, spacing, and environment are treated as a unified system rather than separate components.
Inspection and Ongoing Maintenance
Post-installation inspection is very important. Engineers or operators should:
- Visually inspect floats for damage
- Check for marine growth buildup
- Confirm floats are still secure
In dredging equipment applications, inspections should be more frequent due to constant movement and abrasive conditions.
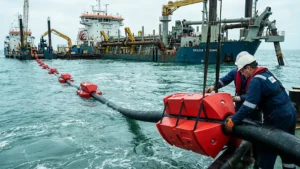
Real-World Example: Dredging Operation
In a cutter suction dredging project, frequent power cable failures were traced back to seabed abrasion. After installing cable floats at calculated intervals, the cable was lifted clear of the cutter swing area.
The result:
- Reduced downtime
- Fewer cable replacements
- Safer working conditions
This is a common outcome when cable float installation is done correctly.
Better Cable Float Installation For Better Performance
Though cable floats are a part of the system, they play a critical role in maintaining stable submersible cable lines. If cable float installation is done correctly, they offer great stability and protects the submersible cable lines from mechanical stress, uncontrolled movement, and abrasion.
A well-structured plan, proper installation procedures, and regular inspection of cable floats always ensure stable, reliable submersible cable lines. By following the above steps, operators can reduce downtime, extend the life of their cables, and keep operations running.
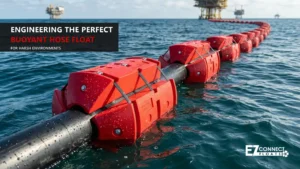
Remember, cable floats are not only about making the line buoyant, but they are meant to offer better control, protection, and confidence in how cables perform offshore. This is what EZ Connect Floats promises with their modular ‘one-size-fits-all’ HDPE floats. Visit https://ezconnectfloats.com/ today to explore how EZ Connect Floats has engineered cable float installation for submersible cables for harsh environments.
Step-by-Step Guide to Cable Float Installation for Submersible Cables
Submersible cables rarely fail due to electrical faults; rather, they mostly fail due to mechanical issues. Ask any marine engineers about this, and they will
Engineering the Perfect Buoyant Hose Float for Harsh Environments
The integrity of the pipeline plays the most crucial role in marine construction, dredging, and offshore energy sectors. Like any other equipment – excavators, dredgers,
The Role of Industrial Hose Supply in Workplace Safety and Efficiency
In high-stakes industries such as oil and gas, mining, manufacturing, dredging, and defense, industrial hoses serve as vital connectors in daily operations. Whether transferring hazardous